
Full Access UTV
Kawasaki KRX 1000 Front Shock Mount Brace Directions
Kawasaki KRX 1000 Front Shock Mount Brace Directions
Couldn't load pickup availability
Thanks for choosing Full Access UTV for your shock mount brace.
Here are some basic directions and a video.
Tools Needed:
17mm socket and wrench
18mm wrench
16mm socket
10mm socket or wrench
1. This can be done with the tires and rims on or off the vehicle. Please use common sense and/or jack stands if you have them.
Set the emergency brake on your KRX. You will need to jack up the front of the KRX to get the front shocks to full extension. You can use a floor jack, or if you don’t have one tall enough, stack some large pieces of wood or something on top of the jack that is safe. Make sure it is safe because you are removing both upper front shock bolts and nothing will be holding up the vehicle.
This will relieve all the weight on the upper shock bolts you are trying to remove. 17mm wrench and 17mm socket.
(Note)
Keep in mind you will need to have no weight on the front upper shock bolts, but you also don’t want the weight of the tires and suspension pulling down on the bolts either. It is best to try and do one side at a time and find the sweet spot. Do NOT remove the shocks from the upper mounts. You just need to pull the two shock mount bolts out.
2. With the KRX up in the air safely and the upper shock bolts removed. Place the full access logo shock brace over the front of the shock mount with the two supplied 6 mm bolts. Get them tight by hand, but do not tighten them all the way at this time. 10mm wrench or socket needed.
3. Install the new longer 12mm supplied bolts through the full access shock mount, and then back into the shocks on both sides. Only leave approximately a 1/4 to 3/8 of an inch of thread sticking out the back side. If you go to far it will make the next step harder.
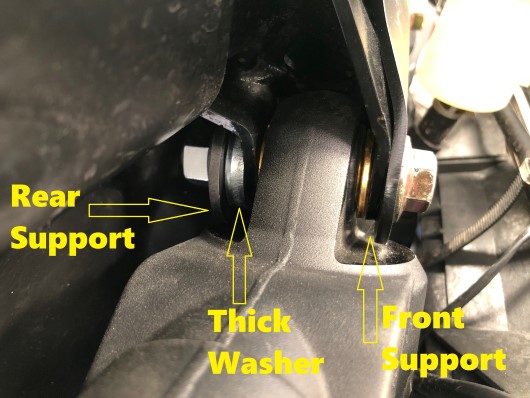
4. Next install the supplied thick washers onto each shock bolts threads.
5. Now install the rear support bracket with open portion of the cut out in the middle pointing upward.

It may be a little tricky to slide it through but we usually start on the passenger side and push it through to the driver side. If you’re having issues generally it’s because you may have too much shock bolt hanging through the thick washers.
(note) The reason for the thick washers and cut out on the rear support bracket. We have tested these on 8 different KRX models. Each one was different. Behind each shock mount is an excessive amount of welding splatter and a plastic push pin for the fire wall.
6. Get the nuts onto the shock bolts and use loctite if you prefer. Tighten the two shock bolts to a torque of 71 foot pounds +. Now you can also tighten the two 6 mm bolts in the center of the front plate (12ft lbs). 16mm socket, 10mm socket or wrench needed.
7. That’s basically it. Enjoy the ride knowing you have peace of mind about your shock mounts!
Thank You! Full Access UTV
